Showing posts with label daring bakers. Show all posts

Tuesday, April 27, 2010

Traditional British Pudding

The April 2010 Daring Bakers’ challenge was hosted by Esther of The Lilac Kitchen. She challenged everyone to make a traditional British pudding using, if possible, a very traditional British ingredient: suet. I did not use suet as it is an animal product. I used a steamed chocolate pudding recipe from www.puddingclub.com. I made four baby puddings instead of one larger one. They weren't great plain but they were pretty great topped with some french vanilla ice cream and some chocolate sauce. The strawberries didn't hurt either. here is the converted recipe:

Steamed Chocolate Pudding

1/2 C Butter
1/2 C Castor (Powdered)Sugar
1/2 Self Rising Flour
2 Tbs Cocoa
2 Eggs
1/4 C Chocolate Chips

Cream the butter & sugar together until light and fluffy. Sift the flour and sugar together and add a little at a time along with the egg. Stir in half the chocolate chips. Place the remaining chocolate chips on the base of your greased (1.1 litre) pudding bowl. Add the dough. Steam for 1 1/2 hours. Turn out and serve with chocolate sauce, custard, or extra thick (whatever that is!).

See steaming method below...


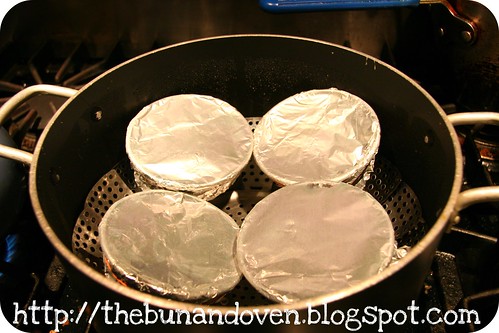
Here are my ramekins wrapped in aluminum foil and secured with rubber bands. I steamed them in a large pot with a steamer basket but you could easily use a crock pot. I used tongs to remove them when they were done as they were very hot. I cooked them for the full hour and a half even though they were smaller.


Saturday, February 27, 2010

Tiramisu Cupcakes

The February 2010 Daring Bakers’ challenge was hosted by Aparna of My Diverse Kitchen and Deeba of Passionate About Baking. They chose Tiramisu as the challenge for the month. Their challenge recipe is based on recipes from The Washington Post, Cordon Bleu at Home and Baking Obsession.
It was mandatory to make the marscapone, savoiardi (lady finger) biscuits, zabaglione, and pastry cream using their given recipes. I hate to tell you but I failed.

First of all this has been a busy month. My best friend (we have been friends since 3rd grade) had her first baby and I had to be there. Traveling was required which ment that I definitely did not have the 2-3 days required to complete this challenge. But time was not my only adversary. Secondly I did not have the funds available to even somewhat follow this recipe (or even the one i did make for that matter). 

I really look forward to our monthly challenges... as a full time mom it gives me something to do for me. And so I decided to make something inspired by this month's challenge. It doesn't count but it makes me happy.


Tiramisu Cupcakes

this makes 18 cupcakes

1 (18 1/4oz) package yellow cake mix (i know. i used a cake mix. hate me if you want.)
3 eggs
1/3 cup oil
water or strong coffee

Make cupcakes according to directions except replace water with strong brewed coffee or espresso if you wish. Bake and cool. Prick cupcakes with a fork or toothpick. The more holes the more coffee they will soak up in the next step. But don't go too overboard.

1/3 cup strong coffee or espresso
1/4 cup sugar

Mix these until the sugar dissolves and let cool. Brush over cooled cupcakes a little at a time until the cakes soak up all of the liquid.

1 cup heavy cream (or 8 oz cool whip)
5 oz mascarpone (or substitute*)
1/2 cup confectioner's sugar (icing sugar)
3 tbs marsala wine or coffee liquor (optional)

Whip heavy cream. Combine mascarpone and sugar. Fold in to whipped cream. Add alcohol if desired... if you choose not to you may want to add some milk depending on the consistency of your filling / topping.

Now use your piping bag to fill the cupcakes. (Push tip of piping bag into center of cupcake. Squeeze icing into cupcake until the top of the cake cracks a bit or overflows with a bit of filling.)
Top cupcakes with left over filling. (If it's too thin you can add some cream cheese and icing sugar.)

This is the kind of cupcake that you will need to eat with a fork. You will also want to use a foil or silicone cupcake liner as a paper one will get soggy and fall apart.
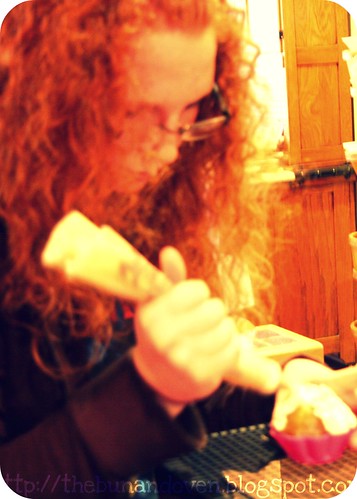
This is my very talented and beautiful sister in law B helping develop this recipe and using her mad piping skills  to make these cupcakes look like hydrangea blooms.

Faux Mascarpone 
(for cheapskates and posers)

8 oz cream cheese
1/4 cup whipping cream (i had to use half & half because it's all i had.)
2 1/2 tbs sour cream

combine all ingredients and mix well until smooth.


and then last but not least here is the beautiful little one. she really started walking all the time this month and is so busy. she wants to be outside 24/7. whew. it's been a busy month and i am exhausted. hope that all of you are doing well.

To check out some real daring bakers challenges just follow the link.


p.s. does anyone know if we are only allowed to miss 2 challenges a year or if it's 2 unexcused challenges?

Wednesday, January 27, 2010

Nanaimo Bars Eh?


The January 2010 Daring Bakers’ challenge was hosted by Lauren of Celiac Teen. Lauren chose Gluten-Free Graham Wafers and Nanaimo Bars as the challenge for the month. The sources she based her recipe on are 101 Cookbooks and www.nanaimo.ca.


Okay so I would have loved to make this gluten free but at this season of my life i have to use what i have on hand or i don't get to make the challenge at all. First off were the graham crackers...
graham crackers

They were pretty great. I really enjoyed being able to share one of these challenges with the Little One. I think that she enjoyed it too.

the bun

And the finished Nanaimo Bars turned out great. They were super rich so I cut them into pretty tiny squares (they look big in the picture but they are on an espresso demitasse saucer.)  and used some sprinkles to add some color. I considered different flavor combinations but since I had never had Nanaimo Bars before I wanted to try the traditional recipe. Which by the way (surprisingly enough) is a super easy no-bake recipe. So we will for sure be making these again.

nanaimo bars
Thanks for a great challenge Lauren! All of us enjoyed it!


p.s. anyone have any suggestions for more traditional canadian foods?

Sunday, December 27, 2009

(daring baker's) home for the holidays

The December 2009 Daring Bakers’ challenge was brought to you by Anna of Very Small Anna and Y of Lemonpi. They chose to challenge Daring Bakers’ everywhere to bake and assemble a gingerbread house from scratch. They chose recipes from Good Housekeeping and from The Great Scandinavian Baking Book as the challenge recipes.


blogreadyhouse2


This post is going to be short and sweet. This time of the year is from now on much, much busier. That's because this is the time last year that my little one was born. She's turning one day after tomorrow. So Christmas may be over but I still have a million things to do.

I chose the Good Housekeeping recipe. I doubled it and the kids made gingerbread cookies with the rest. My template is one from Martha Stewart's webpage which I will link to when I get a chance. Oh and I used a Chocolate Buttercream to stick down all the candies as it was left over from making the Little One's Birthday cake. It was my first ever gingerbread house from scratch and it was a lot of fun. I kind of felt like a kid again making this. Thanks Anna & Y for choosing such a fun challenge!


december2 1099


Tuesday, October 27, 2009

french macarons: a daring baker's fail

macaron

The 2009 October Daring Bakers’ challenge was brought to us by Ami S. She chose macarons from Claudia Fleming’s The Last Course: The Desserts of Gramercy Tavern as the challenge recipe.Actual baking time: 12 minutes total, plus a few minutes to get your oven from 200°F to 375°F.

As you can tell my macarons didn't turn out. I've been making a list in my head of all the things that could be the culprit.
1. I did age my eggs... 4 days in a sealed container in the refrigerator... but the eggs themselves were super fresh. As in my husband went outside and pulled them out from underneath the chickens fresh.
2. I did let them sit until room temperature but it was a cold day. Maybe I should have nuked them for 5 - 10 sec to knock the chill off even more.
3. It was also a rainy day. So maybe the humidity played a part.
4. I did a terrible thing and omitted 1/4 cup of powdered sugar... i know that this was very wrong of me but i couldn't get past how sickeningly sweet to dobos torta was and i didn't want these to turn out the same way.
5. I kinda wished that they had puffed up a bit more. Maybe I should have beaten my egg whites stiffer?
6. The outsides were crispy but the insides were goop. I'm thinking that the oven i used cooks way too hot. (This is why I didn't fill them. They were inedible. Hopefully I still get credit for doing this challenge because I did work my a$$ off. And I don't have time to make more right now. I have a baby!)

Those are my best guesses. The sad thing is for a few minutes I actually thought that they were going to turn out. They developed feet and everything. I even danced around the kitchen when I noticed the feet. sigh. oh well. Such is life.

I will tell you that one thing I am learning from the Daring Bakers is that it's okay to try things you don't know how to do. And that it's okay to fail at those things. There is a lot of pressure in this world to be perfect even though no one is. I'm not perfect and I'm learning to be okay with that.

Well had my macarons been edible the plan was to fill them with a faux Devonshire Cream. And Possibly a fresh strawberry slice. So here is the Devonshire Cream recipe:

8 oz cream cheese
1 cup whipping cream
1/2 tsp vanilla extract
powdered sugar to taste

Whip cheese until softened. gradually add cream until mixture is smooth. Stir in vanilla extract. Add powdered sugar to taste.

And here is the macaron recipe copied from the daring baker's website:
Equipment required:
• Electric mixer, preferably a stand mixer with a whisk attachment
• Rubber spatula
• Baking sheets
• Parchment paper or nonstick liners
• Pastry bag (can be disposable)
• Plain half-inch pastry bag tip
• Sifter or sieve
• If you don’t have a pastry bag and/or tips, you can use a Ziploc bag with the corner snipped off
• Oven
• Cooling rack
• Thin-bladed spatula for removing the macaroons from the baking sheets
• Food processor or nut grinder, if grinding your own nuts (ouch!)

Ingredients
Confectioners’ (Icing) sugar: 2 ¼ cups (225 g, 8 oz.)
Almond flour: 2 cups (190 g, 6.7 oz.)
Granulated sugar: 2 tablespoons (25 g , .88 oz.)
Egg whites: 5 (Have at room temperature)

Directions:

1. Preheat the oven to 200°F (93°C). Combine the confectioners’ sugar and almond flour in a medium bowl. If grinding your own nuts, combine nuts and a cup of confectioners’ sugar in the bowl of a food processor and grind until nuts are very fine and powdery.
2. Beat the egg whites in the clean dry bowl of a stand mixer until they hold soft peaks. Slowly add the granulated sugar and beat until the mixture holds stiff peaks.
3. Sift a third of the almond flour mixture into the meringue and fold gently to combine. If you are planning on adding zest or other flavorings to the batter, now is the time. Sift in the remaining almond flour in two batches. Be gentle! Don’t overfold, but fully incorporate your ingredients.
4. Spoon the mixture into a pastry bag fitted with a plain half-inch tip (Ateco #806). You can also use a Ziploc bag with a corner cut off. It’s easiest to fill your bag if you stand it up in a tall glass and fold the top down before spooning in the batter.
5. Pipe one-inch-sized (2.5 cm) mounds of batter onto baking sheets lined with nonstick liners (or parchment paper).
6. Bake the macaroon for 5 minutes. Remove the pan from the oven and raise the temperature to 375°F (190°C). Once the oven is up to temperature, put the pans back in the oven and bake for an additional 7 to 8 minutes, or lightly colored.
7. Cool on a rack before filling.

Yield: 10 dozen. Ami's note: My yield was much smaller than this. I produced about two dozen filled macaroons.


My batter was not going to make 10 dozen either. It was a lot closer to 1 1/2 to 2 dozen.
I do think that I will try this challenge again... one day when I have some time. I would love to learn how to really make these cookies if for no other reason than to try one. (unless anyone knows where you can find them in Fort Worth?)

And last but not least I thought I would share a picture I took of the Little One at the pumpkin patch. She's almost 10 months old now. It's amazing how time flies once you have kids.
pumpkin

Friday, August 28, 2009

Dobos Torta

The August 2009 Daring Bakers' challenge was hosted by Angela of A Spoonful
of Sugar and Lorraine of Not Quite Nigella. They chose the spectacular Dobos
Torte based on a recipe from Rick Rodgers' cookbook Kaffeehaus: Exquisite
Desserts from the Classic Caffés of Vienna, Budapest, and Prague.

IMG_1418


I'm not going to lie. This has been a rough month. We packed our bags and headed west. We moved from Tennessee to Texas as Husband is going back to school. We are supposed to be living in our own residence on the inlaws many acres (aka the vegetarians have moved onto a cow ranch in texas). But our a/c is not working and almost a month later the movers have yet to actually bring our stuff. Insane right? I'm dying here. I kept waiting and waiting to get my things to make this month's challenge. As you know they never came. I really didn't want to miss the challenge so I spent the entire day yesterday in the Inlaws kitchen while Husband watched the Little One. I finally had the kitchen clean around 10pm last night. I was exhausted. And guess what? I don't even like the Dobos Torta. It's way too sweet to me. And the caramel is too lemony. But here is the recipe anyway. (copied and pasted from the daring bakers website... of course)


Equipment

2 baking sheets
9” (23cm) springform tin and 8” cake tin, for templates
mixing bowls (1 medium, 1 large)
a sieve
a double boiler (a large saucepan plus a large heat-proof mixing bowl which fits snugly over the top of the pan)
a small saucepan
a whisk (you could use a balloon whisk for the entire cake, but an electric hand whisk or stand mixer will make life much easier)
metal offset spatula
sharp knife
a 7 1/2” cardboard cake round, or just build cake on the base of a sprinfrom tin.
piping bag and tip, optional
Prep times

Sponge layers 20 mins prep, 40 mins cooking total if baking each layer individually.
Buttercream: 20 mins cooking. Cooling time for buttercream: about 1 hour plus 10 minutes after this to beat and divide.
Caramel layer: 10-15 minutes.
Assembly of whole cake: 20 minutes
Sponge cake layers

6 large eggs, separated, at room temperature
1 1/3 cups (162g) confectioner's (icing) sugar, divided
1 teaspoon (5ml) vanilla extract
1 cup plus 2 tablespoons (112g) sifted cake flour (SUBSTITUTE 95g plain flour + 17g cornflour (cornstarch) sifted together)
pinch of salt
Chocolate Buttercream

4 large eggs, at room temperature
1 cup (200g) caster (ultrafine or superfine white) sugar
4oz (110g) bakers chocolate or your favourite dark chocolate, finely chopped
2 sticks plus 2 tablespoons (250g) unsalted butter, at room temperature.
Caramel topping

1 cup (200g) caster (superfine or ultrafine white) sugar
12 tablespoons (180 ml) water
8 teaspoons (40 ml) lemon juice
1 tablespoon neutral oil (e.g. grapeseed, rice bran, sunflower)

Caramel topping

1 cup (200g) caster (superfine or ultrafine white) sugar
12 tablespoons (180 ml) water
8 teaspoons (40 ml) lemon juice
1 tablespoon neutral oil (e.g. grapeseed, rice bran, sunflower)
Finishing touches

a 7” cardboard round
12 whole hazelnuts, peeled and toasted
½ cup (50g) peeled and finely chopped hazelnuts
Directions for the sponge layers:

NB. The sponge layers can be prepared in advance and stored interleaved with parchment and well-wrapped in the fridge overnight.

1.Position the racks in the top and centre thirds of the oven and heat to 400F (200C).
2.Cut six pieces of parchment paper to fit the baking sheets. Using the bottom of a 9" (23cm) springform tin as a template and a dark pencil or a pen, trace a circle on each of the papers, and turn them over (the circle should be visible from the other side, so that the graphite or ink doesn't touch the cake batter.)
3.Beat the egg yolks, 2/3 cup (81g) of the confectioner's (icing) sugar, and the vanilla in a medium bowl with a mixer on high speed until the mixture is thick, pale yellow and forms a thick ribbon when the beaters are lifted a few inches above the batter, about 3 minutes. (You can do this step with a balloon whisk if you don't have a mixer.)

4.In another bowl, using clean beaters, beat the egg whites until soft peaks form. Gradually beat in the remaining 2/3 cup (81g) of confectioner's (icing)sugar until the whites form stiff, shiny peaks. Using a large rubber spatula, stir about 1/4 of the beaten whites into the egg yolk mixture, then fold in the remainder, leaving a few wisps of white visible. Combine the flour and salt. Sift half the flour over the eggs, and fold in; repeat with the remaining flour.
5.Line one of the baking sheets with a circle-marked paper. Using a small offset spatula, spread about 3/4cup of the batter in an even layer, filling in the traced circle on one baking sheet. Bake on the top rack for 5 minutes, until the cake springs back when pressed gently in the centre and the edges are lightly browned. While this cake bakes, repeat the process on the other baking sheet, placing it on the centre rack. When the first cake is done, move the second cake to the top rack. Invert the first cake onto a flat surface and carefully peel off the paper. Slide the cake layer back onto the paper and let stand until cool. Rinse the baking sheet under cold running water to cool, and dry it before lining with another parchment. Continue with the remaining papers and batter to make a total of six layers. Completely cool the layers. Using an 8" springform pan bottom or plate as a template, trim each cake layer into a neat round. (A small serrated knife is best for this task.)

Directions for the chocolate buttercream:

NB. This can be prepared in advance and kept chilled until required.

1.Prepare a double-boiler: quarter-fill a large saucepan with water and bring it to a boil.
2.Meanwhile, whisk the eggs with the sugar until pale and thickened, about five minutes. You can use a balloon whisk or electric hand mixer for this.
3.Fit bowl over the boiling water in the saucepan (water should not touch bowl) and lower the heat to a brisk simmer. Cook the egg mixture, whisking constantly, for 2-3 minutes until you see it starting to thicken a bit. Whisk in the finely chopped chocolate and cook, stirring, for a further 2-3 minutes.
4.Scrape the chocolate mixture into a medium bowl and leave to cool to room temperature. It should be quite thick and sticky in consistency.
5.When cool, beat in the soft butter, a small piece (about 2 tablespoons/30g) at a time. An electric hand mixer is great here, but it is possible to beat the butter in with a spatula if it is soft enough. You should end up with a thick, velvety chocolate buttercream. Chill while you make the caramel topping.

Lorraine's note: If you're in Winter just now your butter might not soften enough at room temperature, which leads to lumps forming in the buttercream. Male sure the butter is of a very soft texture I.e. running a knife through it will provide little resistance, before you try to beat it into the chocolate mixture. Also, if you beat the butter in while the chocolate mixture is hot you'll end up with more of a ganache than a buttercream!

Directions for the caramel topping:

1.Choose the best-looking cake layer for the caramel top. To make the caramel topping: Line a jellyroll pan with parchment paper and butter the paper. Place the reserved cake layer on the paper. Score the cake into 12 equal wedges. Lightly oil a thin, sharp knife and an offset metal spatula.
2.Stir the sugar, water and lemon juice in a small saucepan. Bring to a boil over a medium heat, stirring often to dissolve the sugar. Once dissolved into a smooth syrup, turn the heat up to high and boil without stirring, swirling the pan by the handle occasionally and washing down any sugar crystals on the sides of the pan with a wet brush until the syrup has turned into an amber-coloured caramel.
3.The top layer is perhaps the hardest part of the whole cake so make sure you have a oiled, hot offset spatula ready. I also find it helps if the cake layer hasn't just been taken out of the refrigerator. I made mine ahead of time and the cake layer was cold and the toffee set very, very quickly—too quickly for me to spread it. Immediately pour all of the hot caramel over the cake layer. You will have some leftover most probably but more is better than less and you can always make nice toffee pattern using the extra to decorate. Using the offset spatula, quickly spread the caramel evenly to the edge of the cake layer. Let cool until beginning to set, about 30 seconds. Using the tip of the hot oiled knife (keep re-oiling this with a pastry brush between cutting), cut through the scored marks to divide the caramel layer into 12 equal wedges. Cool another minute or so, then use the edge of the knife to completely cut and separate the wedges using one firm slice movement (rather than rocking back and forth which may produce toffee strands). Cool completely.

Angela's note: I recommend cutting, rather than scoring, the cake layer into wedges before covering in caramel (reform them into a round). If you have an 8” silicon round form, then I highly recommend placing the wedges in that for easy removal later and it also ensures that the caramel stays on the cake layer. Once set, use a very sharp knife to separate the wedges.

Assembling the Dobos

1.Divide the buttercream into six equal parts.
2.Place a dab of chocolate buttercream on the middle of a 7 1/2” cardboard round and top with one cake layer. Spread the layer with one part of the chocolate icing. Repeat with 4 more cake layers. Spread the remaining icing on the sides of the cake.
3.Optional: press the finely chopped hazelnuts onto the sides of the cake.
4.Propping a hazelnut under each wedge so that it sits at an angle, arrange the wedges on top of the cake in a spoke pattern. If you have any leftover buttercream, you can pipe rosettes under each hazelnut or a large rosette in the centre of the cake. Refrigerate the cake under a cake dome until the icing is set, about 2 hours. Let slices come to room temperature for the best possible flavour.


We were encouraged to make whatever kind of buttercream that our little hearts desired. I decided on a Mocha Buttercream (a nestle recipe) loosely basing the torta off of a popular latte at the coffee shop i spent the last 4 employed by.

MOCHA BUTTERCREAM FROSTING
4 ounces bittersweet chocolate, baking bar(s) broken into small pieces
2 teaspoons instant espresso powder or instant coffee granules
3 tablespoons milk
1 cup butter, softened
1/2 teaspoon vanilla extract
1/8 teaspoon salt
4 cups powdered sugar

Microwave small chocolate pieces in small, uncovered, microwave-safe bowl on HIGH (100%) power for 45 seconds; STIR.
If pieces retain some of their original shape, microwave at additional 10- to 15-second intervals, stirring just until melted.
Cool to room temperature.
Dissolve instant coffee in milk in glass measure.
Beat butter, vanilla extract and salt in large mixer bowl for 3 minutes.
Beat in melted chocolate until blended, scraping occasionally.
Gradually beat in powdered sugar until light and fluffy.
Beat in coffee mixture, 1 tablespoon at a time, until desired spreading consistency.


group_w

Monday, July 27, 2009

mallows & first swims

mallows

The July Daring Bakers' challenge was hosted by Nicole at Sweet Tooth. She chose Chocolate Covered Marshmallow Cookies and Milan Cookies from pastry chef Gale Gand of the Food Network.
We could make both kinds of cookies or just choose one. I started with the Mallows.
I actually made these in 3 acts over the course of 4 days. I know that sounds crazy but if I hadn't then these never would have happened.

The first day I mixed together the cookie dough.

3 cups (375grams/13.23oz) all purpose flour
1/2 cup (112.5grams/3.97oz) white sugar
1/2 teaspoon salt
3/4 teaspoon baking powder
3/8 teaspoon baking soda
1/2 teaspoon ground cinnamon
12 tablespoons (170grams/ 6 oz) unsalted butter
3 eggs, whisked together


1. In a mixer with the paddle attachment, blend the dry ingredients.
2. On low speed, add the butter and mix until sandy.
3. Add the eggs and mix until combine.
4. Form the dough into a disk, wrap with clingfilm or parchment and refrigerate at least 1 hour and up to 3 days.

This is the point where the dough sat in my fridge for all 3 of those days. I'm terrible I know. On the third day I started having flash backs of the time I attempted to make cheese straws and ruined the dough by leaving it the fridge over night. I figured that unless I wanted to make the dough again I had better get on with it.


5. When ready to bake, grease a cookie sheet or line it with parchment paper or a silicon mat.
6. Preheat the oven to 375 degrees F.
7. Roll out the dough to 1/8-inch thickness, on a lightly floured surface. Use a 1 to 1 1/2 inches cookie cutter to cut out small rounds of dough.
8. Transfer to the prepared pan and bake for 10 minutes or until light golden brown. Let cool to room temperature.

And here is where the vegetarian in me had to veer from the recipe. By recommendation of Tasty Trifles (on the alternative baking forum) I found this recipe for vegetarian marshmallows on Pie of the Tiger.


60 mL water
pinch of cream of tartar
255 g sugar, granulated
255 g light corn syrup
½ vanilla bean (or vanilla extract if you are me. i used 1/4 tsp because that's what the carnivore marshmallows call for. that was my logic anyway.)
85 g egg whites (about 3 egg whites)
5 g xanthan (0.76%)


Grind xanthan with a tablespoon of sugar. Set aside. Heat water, cream of tartar, remaining sugar, corn syrup and vanilla to 248*F . Discard vanilla bean. Whisk egg whites for about 2 min until still soft. Continue whipping egg whites at slow speed while adding syrup slowly. Sprinkle xanthan mix while still whipping. Turn speed up and continue mixing for 2-3 min or until meringue pulls away from sides. Sprinkle a pan or baking sheet generously with cornstarch and spread out the meringue. Sprinkle top with cornstarch, cover with plastic and leave to set for 4 hours in a refrigerator. Cut marshmallows into desired shapes and dip cut surfaces in cornstarch.

Let me just tell you that my marshmallows were so sticky. Maybe I didn't use enough cornstarch who knows. I did cut them out but I had to dip my cookie cutter in cold water in between each cut out. if there is ever a next time lets just say that i will go to town with the cornstarch.

The 4th day: After cutting out the marshmallows with the same cookie cutter that i cut my cookies out with i attached (quite easily i might say.. since they were so sticky)the marshmallow to the cookie part. this was slightly awkward because my cookies shrunk up a bit when they baked so my marshmallows kind of hung off the edges. At this point though I really couldn't be bothered. I had been making these darn things for over half a week and I was ready to be finished. Besides... what could I have done anyway?

The final (and most daunting) part of the mallow baking gauntlet was last. The chocolate glaze. Maybe I should mention here that chocolate and I have a past. When it comes to working with the stuff I have made every mistake in the book. I usually go over the stove with a double boiler and have ended up with all sorts of monstrosities the worst of which resulted in a massive glue like chocolate clump.

Well not too long ago I saw Ina Garten melt chocolate in her microwave and I decided that if she does it then it can't be that bad. So that is the route that I decided to take.

12 ounces semisweet chocolate
2 ounces cocoa butter or vegetable oil (i used veggie oil)


were thrown into a pyrex dish and heated in 10 second increments on medium power, stirring in between each heating . it worked like a charm. the only problem that i encountered using this method what that my chocolate coating ended up being "swirly" looking. that was fine by me because my chocolate hardened up just fine.


Then the day came that I had set aside to make the Milan cookies but I chose to take the little one swimming for the first time instead. We don't have a pool and we currently don't have access to one so I think that I made the right decision.
the bun

p.s. she loved it. happy july everyone!


group_w


*parts of this post (the recipe itself) was copied from the daring bakers webpage.

Friday, June 26, 2009

bakewell tart ...er... pudding


tart

The June Daring Bakers' challenge was hosted by Jasmine of Confessions of a Cardamom Addict and Annemarie of Ambrosia and Nectar. They chose a Traditional (UK) Bakewell Tart... er... pudding that was inspired by a rich baking history dating back to the 1800's in England.

This was my first challenge as a daring baker and I had a lot of fun. As you can tell from my photo it didn't turn out perfect but I just tried hard to remember what I have learned from the Nester " It doesn't have to be perfect to be beautiful" or in this case delicious.

The first component was making a "sweet shortcrust pastry" . It sounds daunting but is really like making a pie crust that just happens to also taste like shortbread. It calls for almond extract. While I do like almonds I personally do not like almond extract so I used vanilla.

Sweet shortcrust pastry

Prep time: 15-20 minutes
Resting time: 30 minutes (minimum)
Equipment needed: bowls, box grater, cling film

225g (8oz) all purpose flour
30g (1oz) sugar
2.5ml (½ tsp) salt
110g (4oz) unsalted butter, cold (frozen is better)
2 (2) egg yolks
2.5ml (½ tsp) almond extract (optional)
15-30ml (1-2 Tbsp) cold water

Sift together flour, sugar and salt. Grate butter into the flour mixture, using the large hole-side of a box grater. Using your finger tips only, and working very quickly, rub the fat into the flour until the mixture resembles bread crumbs. Set aside.

Lightly beat the egg yolks with the almond extract (if using) and quickly mix into the flour mixture. Keep mixing while dribbling in the water, only adding enough to form a cohesive and slightly sticky dough.

Form the dough into a disc, wrap in cling and refrigerate for at least 30 minutes


Once your crust is chilled roll out your dough and place into a 9in tart tin. (Do not do what I did and put your crust into a 12 in tin thinking that it is a 9 in tin and wondering how anyone had any left over crust.) Then pop your crust into the freezer for 15 min. This is a good time to make your frangipane.

For the frangipane i once again subbed vanilla extract for the almond. I also do not have kitchen scales so I just did the best i could with conversions. It turned out fine and always has for me(... see my hot cross buns & vegemite scrolls recipes i do this every time).

4 oz is about 1/2 cup and 1/2 oz is about 2 tbs

I used my trusty blender to grind the almonds, yes mine curdled, and I commited the wost sin possible in the baking world... I used salted butter. It turned out fine. really, better than fine. It turned out good. By the way, primrose is a yellowish color.

Frangipane

Prep time: 10-15 minutes
Equipment needed: bowls, hand mixer, rubber spatula

125g (4.5oz) unsalted butter, softened
125g (4.5oz) icing sugar
3 (3) eggs
2.5ml (½ tsp) almond extract
125g (4.5oz) ground almonds
30g (1oz) all purpose flour

Cream butter and sugar together for about a minute or until the mixture is primrose in colour and very fluffy. Scrape down the side of the bowl and add the eggs, one at a time, beating well after each addition. The batter may appear to curdle. Don't panic. It’ll be fine. After all three are in, pour in the almond extract and mix for about another 30 seconds and scrape down the sides again. With the beaters on, spoon in the ground nuts and the flour. Mix well. The mixture will be soft, keep its slightly curdled look (mostly from the almonds) and retain its pallid yellow colour.

Preheat your oven to 400*F and prepare yourself for the assembly of the tart..er..pudding.

Now is when you would remove your crust from the freezer and spread warmed jam over it. Many people made their own jam which I am sure made this dessert even more fabulous. With a 6 month old I don't really have that kind of time. I used store bought blueberry jam. Once my jam was evenly spread I popped it back into the freezer for a few minutes to keep the warmed jam from bleeding into my frangipane. Once it was set I evenly spread my frangipane and popped the whole thing into the oven. It cooks for 30 minutes total but 5 minutes before it's done you should take it out and toss a handful of slivered almonds over the top. I ment to do that , really I did. Unfortunately during the cooking time I got distracted and didn't check on it until the timer went off. This is when I realized that I had used too big of a pie tin. My little tart could take no more baking and the crust was a bit more well done than i would have prefered.